Gizzys25
-
Posts
57 -
Joined
-
Last visited
-
Days Won
3
Content Type
Profiles
Forums
Events
Gallery
Blogs
Everything posted by Gizzys25
-
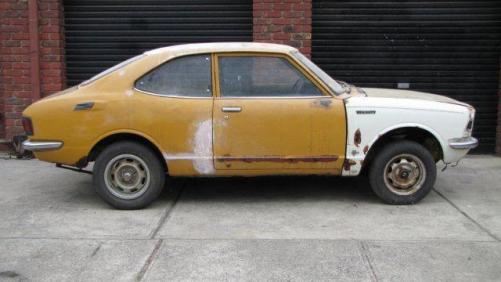
Ok managed to get a closer look at the new spare parts car, Roof, a few small dents. Rear Qtrs, Perfect behind the wheel arch. Doors, Repairable, but I have 2 rust free skins on the KE20 ones to make it easy. Front Chasis Rail, Perfect. Interior, Apart from missing Seats and carpet, Perfect door cards and trim pieces. Bumpers realy good Boot lid, Repairable. Bonnet, Hopfully repairable, Have 3 now so might be able to do a cut and shut to make 1 from 2. Full set of matching Locks. Full set of Glass, (Windscreen scratched though, but should polish out. Plus all badges and chrome trims and a brand new Dash Pad sitting ready to fit. Down side, everything else is dented or rusted, so not realy a good restoration car, thus why a parts car. Then I took a look at the roof of the blue one. Don't think I'll try and save this. Lucky I have a spare now. Cleaned up the 4AGE, this thing was black because the prior owner didn't replace any seals when replacing the timing belt and other parts I found looking very new under it all. (Inc a New Exceedy Clutch) Complete gaskit kit for this before fitting. Now to fit the RWD intake and manifold I have. Here's a couple of snaps of all 3 together. Now to get a panel beater to look over the 3 to be sure I'm fixing the right 2.


-
On mine there were 2 hooks. Slip the chain over them and lift. Make sure nothings connected though. If fwd, easier to bring the gearbox with the engine as it is a straight vertical lift. Disconect the CV's If rwd, leave the gear box behind and slide forwards before lifting to clear the input shaft. Good luck and take your time.
-
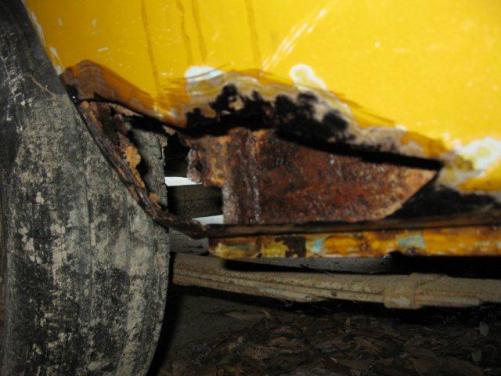
Spare parts Apart from some serious rust in the drivers side pillar dosent look too bad. Still yet to go completely over it.

-
Wow, what a car. Havent realy seen any good pics of a TE37 till now. Let alone a Levin. Glad to hear you are going to restore it to its former glory. Keep the Pics coming as the resto is done.
-
Been on more of a parts hunt of late. Sourced a T50, another rolling shell for all the rust repair sections and roof I need and spare removable panels and a new dash top, second grill and set of trim for one I had. (thanks Modify for both) KE25 Sports Stearing Wheel for the second car (Thanks Raven) and a heap of other stuff that gets hidden once it all goes together. Polished all the black paint off the badge(from the last respray) and re-fitted with the chrome trim and both grills look pretty good. Now I've seen the black with Chrome I'll keep it like that on one car and grey/silver on the other. I'll polish both sets of trims and repaint the black one before they are fitted back on the cars. The roof on the yellow one is nearly sorted, so much for a couple of days work. That rear qtr same. Started on the other side and thankfully not as bad. Parts left to get for both cars is now getting realy short. The main one left is a set of 4AGE to Ke25 cross member engine mounts. But no rush, till I replace the front chasis rail there is no way to fit the engine anyway. + a second set of wheels. Toying with just getting another pair of Cresida rims, with the chrome trims and caps like on the back at the moment for the front. But if something nice pops up then that can change.

-
Been a bit lax on the cars, and away on Scout Camp's so next to no progress. But the replacement lower support pannel has arrived. Now to get that front sorted. Found the second one, Well sort of. Been lucky to locate some more bit for this one, so it may get started sooner than I thought. Need to replace the doors(Currently KE20 ones, find a rear window and the rest of the insides. Have Seats but nothing else.


-
Looks like I'll be trying to tidy up the chromeware, the Black idea was to hide some rust spots. I think there might be a couple of decent bars amounght all the ones I have. The platsicware is still all black from last time, so i was just going to tidy it up and re fit, and paint any new replacment parts to match.. I thought it looked good, well that was 20 years ago when i did it. To break up the black in the bay i guess I could paint the engine.
-
Pictures say it all. At least acces to the engine bay is easier now. Next, replace the missing parts and paint. Do I paint the bay GMH Black or Yellow to match the car?? Pros and Cons, Black Easy to patch up and hides the marks, hard to see in the bay as it will naturally be Dark as a result. Yellow, Brighter and match the car, will need to be a better job in there as it will show up the flaws. Planning on making the Grill, Nose Cones, Front and Rear vents, Door handles and possibly the bumpers all Black as well. Ideas fellow Rolla's


-
Forgot to add. If drilling in from with it behind seams to hard Pre drill with on top. Or use some bog to glue it in.
-
A cleverly cut sheet of metal A hole in the middle and a peice of wire to hold it while you attach and access problem solved. The hole looks wider than long so you should get it in from the front.
-
When a bit crazy with the sander and filler. found a few more dents than I new about. The roof turned out to be more of a mess than I thought. Most likley a couple of days here. then the drivers side rear quater has a few more low spots than i was aware of. Looks like this side has seen major repairs in the past. At least the drivers door should be easier. Only appears to have the one dent. And these are what I thought to be the easy areas. Not looking forward to the actual major rust areas.


-
Re the large hole. Bog on it's own will get a bit thick. Can you access the back of the hole? If so fiberglass the hole from behind then a thin layer of bog at the front. Or rivet a steel section in behind an skim the top. If Riveting counter sink the holes and punch in a bit so the rivets are below the panel level. Both will give a beter finish than bog alone. I need to do the same on an even lager hole in my rear quarter. Regards Dean.
-
Not sure which one is going to be harder. The yellow one with rust or the one with the damaged roof. At least with the yellow one I have nearly all the parts. The other one, well as they say, always on the look out.
-
Thanks James. Seems a popular spot for rust as I have a bit to rust in the same spot on my KE25. Working on that spot later. Dean.
-
Sorry James.. Let me know if you have any luck, If not do you have photos of what it looks like as i have access to Engineering firms and mybe able to make me one. Dean
-
Hi Glen You mentioned a factory kit to fit an A series engine to a K series frame, where did you get it from? I have a Custom made one for one of my KE25's but if there is a better option I'd rather use it for the second one. Regards Gizzys25
-
Thought it about time I re did the old girl again. Last time was over 20 years ago. This time I'm going down a different path from last time. Previously it was a fully worked 3k and 4 speed that was a real lot of fun. Embarrassed a few V8 Torana's in its day. Now I want Reliability and simple auto driving. And also passing on to my son once on his P's Later this year. Also cleaning up the rust and fitting either a 4ac or 4AGE with a 3 speed auto. Mods apart from that will include KE30 rear diff and AE71 Front brakes on KE30 Hubs. + Sigma GSR 14" Alloys. Also going to try and fit air conditioning while I'm at it. I have sourced a complete AE82 Seca for a donar car and an RWD 4ac with auto. Here it is 20 years ago and where I'm trying to get back to. Where I need to start from. Rust spots. The worst is the rear Qtr and under the battery tray. Once this one is under way I'll get a start on the second one. Pics of that one to follow later once uncovered and out of the Garage, under 2 years of Junk. I have a 15 year old son wanting a full on off road machine with a set of mud tyres and roof chop. Need to convince him otherwise, but this one was a saved shell from a wreckers and suffered roof damage. Best part is next to no rust.