

dannyboy86
-
Posts
58 -
Joined
-
Last visited
Content Type
Profiles
Forums
Events
Gallery
Blogs
Everything posted by dannyboy86
-
So got a little bit of wood work happening today and remade the spare wheel cover because it was cracked, corner snapped off and was very warped. Ended up doing it it 6mm masonite for some extra support. Nearly double the thickness of the original stuff. Just got to get another tool clip for it.


-
Got more work done on the car today, put all the rest of the interior plastics in. Replaced all the old screws with brand new black screws, looks so much better! Put all the ae93 sx interior seats in. Seats need a really good cleaning, going to hire one of those carpet cleaners from woolies. Bought the interior off some guy who didn't tell me that there was cigarette burn marks in the driver seat, so I was pretty pissed about that when I took the seat cover off...I should of checked when buying them but was in a rush. Anyways they will be covered with some spare snaps on I have. Put the little windows in both sides and all the door rubbers, window rubbers and silicone sprayed all the tracks so they glide better.


-
Yeah I was quite happy with the carpet. The back seat area looks brand new and the front pretty good aswell. They guy didn't drive the car much so that was a bonus. The tail lights came out quite well. I must masked them all up, rub them back, plastic primed them and the gloss black over it. Just trying to make the car look tasteful not doing anything that would give the cops a reason to pull you over for.
-
The pearl flake can be hard to paint because you need to keep the same distance and angle of the gun when spraying otherwise you might get dull spots because the flake is not sitting correctly. Yeah I just mixed the the pearl flake in with the clear, well thats what I was told. But I spoke to another guy and he said it has to be mixed in with a binder so that the flake lay flat. I had some sticking up but wasn't really a biggy because I blocked the whole car back after 2 coats of the flake mixed with clear and then spot another 3 coats of plain clear over that. For mixing ratio they guy I bought the flakes from he said 25g of flake to 1L of clear. But it call comes down to personal preference on how much flake you like. I would recommended mix up your flake and shoot it on a test panel and if you like more add more. Another thing you can't use a paint strainer when pouring the clear your gun because the flake clogs it up and you will have to take the small filter out of the gun because that will clog to. Yeah she can't wait for the car.
-
Progress with the rolla is going well. Still waiting on my buffer polisher to arrive, so In the mean time Ive started putting the interior back together. Shopping bag full of all the screws, nuts & bolts and other little parts of the car. Lucky I bagged and named every screw and were it goes because it would be a nightmare to put back. Vacuumed and cleaned again before laying carpet I cleaned the carpet aswell. Scrubbed it with a broom with omo and hung it up and hosed it until the water ran clear from it. Surprising how brown and smelly the water was from this carpet. Got all the console and dash plastics in Put all the hatch seals on Put the wiring in the hatch with tail lights and re applied the vinyl roofing (what a sh*t job) Close up shot of the tail light resprayed gloss black and the tow point in gloss black aswell.


-
Haha the common mud tunnel. Yeah I'm afraid when I take out my front windscreen there might be rust, just having my fingers cross there is no rust. On the other hand there was a little rust on the rear tail jamb in the top right corner under were the rubber seal is supposed to be. So I have that a good wire brushing and then rust treated it. Hopefully want have any more problems with that. To take off the vinyl head liner to access the wiper stuff you will have to take off the metal strip off, and then if I remember correctly there are these metal clips that are pinching the vinyl on the edge of the frame. I just a tiny small flat head screwdriver to help pry these clips off. By the way I just saw your thread of your car and wondering how much did the new windscreen and rubber seal cost? Cause I have to get mine done and I don't want to use the original corolla seals.
-
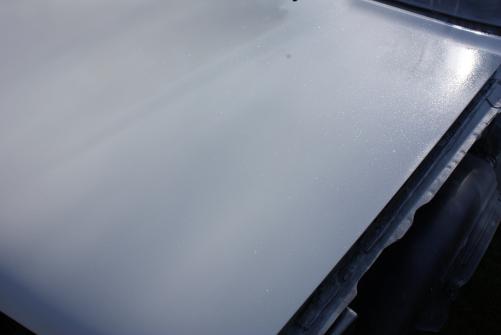
Update: Had to buy a new spray painting mask after speaking to a few spray painters because the mask I was using hasn't got the correct filters for 2k paints. So invested in an awesome Sundstrom mask. Got the bumpers, Fuel cap & grilles all primed Got the inside of the hatch jamb sprayed. Had to mask off the whole car not to get over spray. So once that was done sprayed the jamb and the inside of the hatch, front and rear bumper, grilles and fuel cover. Repaired some deep scratches and marks in the front and rear bumper with plastic body filler. Basecoat and clear finished just didn't get any clear pictures. Completed wet sanding the car back with 1500g then did a float coat of clear to finish. Panels of the car feel like glass :) So happy with the result! Just have to wet sand the front and rear bumper, grilles and fuel gap and do the float coat of clear on that. Hopefully bring the car back home next week and then hand polish and polish sealer the car and start putting it back together. Finished product on the LH quarter wet sanding with 1500g and the float coat without polish Resprayed the surrounds of the rear tail lights gloss black Resprayed the cowl gloss black Tow point for a coat of black aswell Did a matching paint job on my iphone case while painting the bumpers


-
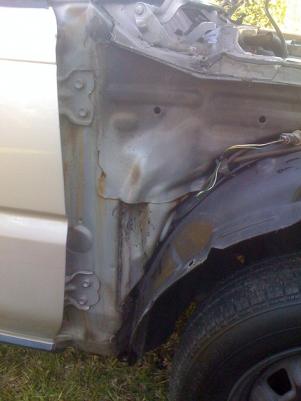
Yeah you will have to take the quarter Panel off, It wasn't to hard to take off. You will need to take out the front grille and head lights if i remember correctly and there are some bolts behind there. 3-4 bolts on top so lift up the bonnet and remove them. Mud flap need to come off with 1 or 2 bolts underneath the quarter panel. I recommend to remove the cowl but you will need to remove the windscreen wipers and then take out all the screws from the cowl. It becomes a bit more of a job when you have to remove all this stuff but hopefully this is the problem and you wont have to do it again. If your going to all the trouble to do the left side you might as well do the right side as it will probably be blocked as well and won't take to much longer to take of the right side. As you can see from the picture above. Stick a screw driver up there and break up the dirt and crap that's blocking the drainage hole. This is when you can stick the hose underneath were the cowl was in the corners and wash it out. If it is block you will be amazed how much dirt and sludge will come out. I kept on washing it until the water ran clear. Hope this helps!
-
Update: Yesterday started putting some colour down, got 2 good coats in because it started to get windy. Today put the 3rd coat of basecoat down and 2 coats of clear with flake in it. Its pretty sparkly!! When the sun hits it, it really shines You can actually see the flake in the paint job...i thought the flake was going to be much finer but I'm still happy with the result. Still have to do a few more coats of clear because I can still feel the flake so that will be getting done tomorrow. Before Clear 3 coats of Taffeta white This is after 2 coats of clear with flake. The pictures don't do it any justice. Might need to get a picture without sunlight because its hard for the camera to pick up the flake.


-
Update: Finished wet sanding the whole car back with 600g sandpaper. This took ruffly 7 hours to do today...minus front and rear bumper, so I'm glad that's all over with. The car is now ready for some colour! :D I'll get some pictures once it has some colour on it...hopefully tomorrow.
-
Update with the rolla. Haven't gotten much done this past week as the weather in Sydney hasn't been the best, plus getting organised for a job interview and celebrating my birthday. There was a little surface rust on the console/ dash mounts so I removed that sanded them back and resprayed gloss black, looks alot better. Just sprayed the guide coat on and going to start wet sanding the collora.


-
Metallic white pearl flake arrived :)


-
With the beautiful weather we had in Sydney on Friday and Saturday got the car sanded back and primed :) Really happy with the job, only got 1 small dag in the primer about the size of a 10cent piece but its no biggy will come out when went sanding. Other than that no runs! :laff: Time for picture! THE CAR IS CALLING All sanded back and masked off. Didn't bother about the front windscreen because its getting replaced anyways. Sprayed it with the hatch down and will do the hatch jamb when the bumpers are getting sprayed plus will remove the bonnet and spray the under side. All door jambs got sprayed aswell. All primed! Opps forgot to mask off the aerial :o Front bumper metal strip, quarter panel with replacement panel and front left door sanded back and primed. Wow that was a big post! Sorry about the quality of some picture. Some taken with the SLR and the others iphone.


-
I thought about using the originals but if these generic rubber seals your talking about does a better job I will probably go with that. Thats for the tip :y: I'm doing 2k paint, everyone has told me that the colour last alot longer with 2k paints.
-
lol I think your talking about my one, I did the post about the leaking ae92 :) removing the platic trims I used a small flat screw driver starting from the back door and slowly prising the plastic off the rail till I reached the front then it pretty much popped off. For the windscreen trim the clips and plastic is pretty fragile. There is ruffle about 5 - 6 clips on both sides. Pretty much just used the same method with a flat screw driver trying not to break the clips. Then you can take the corner molds off which will allow you to take the top trim/ seal off the windscreen. This pretty much pulls off just start from one side and start pulling it off. This part has a sort of metal or something in it so that if you bend it it will keep the bend but it can be straightened out again. Hope this helps The clips looks something like this

-
Update. Got the car primed minus front and rear bumper. Need to buy some plastic primer. Pics coming soon. Removed all the window trims and found some little surprises. Few ants nest in different locations on the car. Little bit of surface rust around the windscreen which I'm happy about because its nothing major. Smoothed out the bog and finished the repair on the rear door and wheel arch.


-
I decided on painting the car white. Went out to Autolac in Brookvale and I would highly recommended them to all. Really helpful and took the time out to explain things so :y: to them, plus very reasonable in price...$50 to $100 cheaper than other places I went to. The colour is Honda Taffeti white. Looks really nice and crisp. Ive also got coming white pearl metallic flake coming which will be mixed in with the clear to make that car pop when its out in the sun :cool: So while everything thing was out I decided to brush on sound deadener paint. Not sure with this stuff works but thought I would give it a try.


-
All screws, interior plastic and carpet tagged and bagged. interior door trim brackets looked a little to rush so sanded them back and respayed them matt black. Did the same with the rear brackets but gloss black. You will never see these brackets once the cars put together. But I can't resist making it look fresh and new :laff:


-
Thanks mate I'm giving it a full respray, stereo and just going to clean it up. Depending on how much ive spent on it in the end might lower it and put some stock alloys on it. I have a complete set of ae112 levin alloy 8 spokes which would look nice on it. Just tossing up if i should put them on my corolla. The car is being given to my girlfriend to drive as a daily so I don't want to go overboard with stuff.

-
While I had the car jacked up I decided to paint the calipers for that extra power! I will be taking the disc off and giving them a good clean up after ive finished painting the car. Took all the interior plastic out including the one sorry looking seat. Car came with a bonus used bandage. with an unidentified hair on it :| Carpet removed I'm RICH B!TCH!!


-
Yeah its only has a tiny bit of surface rust above the windscreen which i was pretty happy with because my mates one had a heap of rust holes above his windscreen. I only ended up getting all the interior seats front and back include the the door cards / trims. I was going to keep all the original plastic thats in it because its pretty immaculate other than being filthy. Its that bluey grey colour with out any chalkiness to it. Console lid, b pillar trim are perfect. The boot panel are pretty good with only a few small scratches in it which I'm not to fussed about.
-
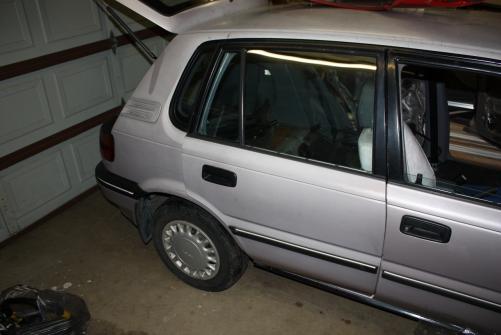
Hi everyone, this is my first project build car. I have a ae102r corolla which I have done work on, but never done a build to this extent. A mate of mine traded a case of corona's for this car off some guy wanting to get rid of it. It had been sitting in a locked garage for 3 years with no rego and prior to that only been driven around locally. He was the original owner and bought it new from the Toyota dealership. It has 145,000km on the clock which I'm pretty happy with. I ended up buying this car off my mate for a few hundred which was the price for the replaced door and guard which he had purchased to fix the damaged ones on the car. The engine is staying stock as this car is being built for my girlfriend. My mate already took the interior out of this car for his corolla. So Ive picked up a full ae93 sx interior, trim and all which should look pretty nice. I will be re sprayed the corolla in either a red or a white still have decided on the exact colour yet. For the stereo It has the original tape deck in it which I'm going to keep in it because it looks pretty sweet having that there. But other than that I haven't put a lot of thought into it yet. I got my hands onto the car about 4 weeks now and made some good progress on it so far. The heavy rain we had for a week in Sydney slowed down progress as I couldn't get much done as the car is out doors. Hope you enjoy! This is what I had to work with. I cleaned the engine bay because it was greasy and grimy. Went to town with the degreaser and got that thing looking a lot better. The original owner was a smoker so he would of smoked in the car for at least 15 - 16 years of it. The interior plastics were dirty and ash trays still had ash and cigarette buds in them...:o Next I did a complete service changing all the fluids using treatments. Changed the air filter, thought it might need a change. Removed all the outside door trims of the car. Unfortunately when removing the rear passenger side trim off it tore paint and all straight to bare metal leaving a good ditch in the paint which I ended bogging it up. While I was back there tapped out the dent in the wheel arch as much as I could but Its pretty thick steel so bogged the imperfections. Gave the interior and good clean with some armor all which looked a hell of a lot better than how i got it, plus vacuumed the carpet. More pictures to come when I take them off the camera.


-
Good idea with the deadener! Yeah just got to clean up that surface rust because its going to get a new paint job. I will be posting up a progress build thread soon when I take the photos off the camera.
-
I think I have solved the mystery of why the water has been dripping down near the accelerator pedal. I took off the right quarter panel to get the body prepped for painting and notice that were the water is supposed to drain out from when it rains which runs down the cowl underneath the front windscreen had been completely blocked. After poking it with a screw driver a heap of dirt and water started to come out. Finished off my putting the hose under were the cowl supposed to be and flushed out both side. Checked inside the car and didn't have any water drops coming in so I'm pretty pleased. Now its just time to get this car painted.

-
I haven't had the problem with my corolla. From the sounds of it it must be leaking from the rear hatch seal or the seal on the little quarter window behind the rear doors.


