

_FNQ_rolla_
-
Posts
401 -
Joined
-
Last visited
-
Days Won
2
Content Type
Profiles
Forums
Events
Gallery
Blogs
Everything posted by _FNQ_rolla_
-
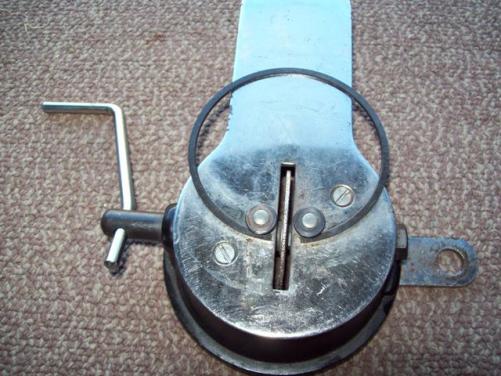
Just a little update Did a little work on the alternator over the last week. Totally stripped, cleaned, polished sprayed with a clear with a gold pearl and refitted with new bearings. Also last week I sprayed the block in a gloss black and fitted new welsh plugs. Piston for boost Setting the rings gaps to suit boost. If I have the time I might get to put it all together over Easter break.


-
Looks very tidy.
-
Well if you’re not too sure as to what you want measured, how about telling us what are you planning to put these motors into. Sorry, I hate saying this, but "have you had a search of the many different threads on here or have you had a look at the FAQ"? All the best
-
Well I sold my white AE92 supercharged Corolla and the KE35 has been my daily for the last 3 months and we both needed some time to ourselves. The little Rolla has been through a lot in those last 3 months, 2 cyclones and Floods (we were both over it) and it has now been parked in the shed for the last 4 weeks as I was starting to hate it. I have another Toyota in the stables now (much bigger so I can tow a car trailer when needed). But I have not had much time for the KE35 for the last 4 months do to house renno’s , but in about a months time I should be finished with the house and then its KE35 time. :yes: I live in the city centre of Cairns. P.S. first page has been updated :y: First page link
-
WoW, Car of the year I did not even realise that I was nominated for “Car of the year” ….. Thank you "Undertaker_is_the_best", but in my opinion it is not up to that standard. I might have it finished by the end of this year.
-
Looking forward to seeing your power figures.
-
Happy Birthday greenmac80, hope you have a good one
-
I have an idea for a winter camp / road trip ~ come up to Cairns. (September I’m going on camping trip to Weipa ~ Bamaga ~ and the tip of Queensland, you are all welcome to come along, maybe leave the Corolla’s at home for that trip.)
-
Hi there, I have not touched the ride height of the car yet as I want to do the motor mods first and then set it up for the strip. As for the offset on the rear they are “0 offset’s”. Here are a couple of pics of the car I have on this computer. All the best ** EDIT ** The guards have not been rolled and it does not scrub(I can fit a finger between the wheel and the rear guards)


-
Hey there, I when for 15inch mags with 50series tyres to have the same height as the original factory 13inch tyres so the speedo was not out. I went for 8 inch on the rear and 5 inch on the front to help with steering otherwise it becomes too heavy. Here is a picture of the 8 inch rim on the rear. All the best

-
^^^ The above is a NASTY Youtube video!
-
Love the colour :yes:
-
Well all I can say is a lot has NOT been happening with my KE35, as it has been my daily for the last 3 months, but during this time I have been acquiring some more bits and pieces. I am looking at putting some aftermarket gauges into a modified dash panel similar to what Greenmac80 has done. Picture taken from Greenmac80’s thread I’ve been thinking about getting an Autometer speedometer electronic programmable gauge. http://www.autometer.com/cat_gaugedetail.aspx?gid=3137&sid=-1 Now my question is has anyone set up one of these onto a “W” series gearbox and do the “W” series gearbox have the an option of having a factory installed sine wave 2 wire sender on their speedo output. There is an option of buying a “Hall-effect sender that will make this speedo work but I would like to keep most things Toyota if possible.


-
I never knew about the “OMP” on the rotary engines, and as for one of those Wilwood bias valves ……. “You know you want to”! :nervous:
-
I’ve been wondering if you were going to come back with another Corolla. Will the 2 door turn out Yellow like the other one or do we have to wait and watch this thread :P Good to see your back with another project.
-
Yeah your right, it’s not on my “to do list” as I am not interested in knife edging this crank and I polished it “because I can” in the back yard. Ok Let’s just say I did want to “knife edge” the crank then there would have been a different process; 1. Firstly I would have sent the crank south to be “knife edged” then it would have to be balanced and then sent back (so freight down and back up). 2. Then I would have to remove the rough casting on the remanding parts of the counter weights by sanded them out to a polished finish that I want (I am a fussy bastard when it comes to my engine standards). 3. Then I would have to pay a second lot of freight (down then back) to balance all the rotating mass. (Now a machining shop might polish a crank to this standard and if they did I could not afford the labour time for them to polish it, I spent over 200 hours or more. So lets say a machine shop was to charge $88 per hour and lets say it would take 100hours to polish the remanding rough casting off the counter weight, it would cost $ 8 800 ). As I said I polished it “because I can” and I am not interested in knife edging it.
-
Trust me, everything that rotates between the crankshaft pulley (conrods and pistons) to the flywheel is being balanced
-
Well stay tuned !
-
Hey I would love to have a clear window sump to show of what I have done, but at the end of the day like I said “I did it because I can”
-
Are you serious! Its one thing to polish the crank counter weights in the back yard, but to “knife edge” a crank come on! Sure I could set it up in a 4 jaw chuck on a lathe (or the CNC) but there are many factors that have to be considered 1. Have an even radius on all of the rotating counter weights 2. Or to even to attempt to put a leading knife edge on the rotating counter weight Its not just get a grinder out and put an edge on a crank. Not to mention there are other factors like static and the dynamic balance. I hope that anyone who reads this understands that you DO NOT take to a crank and put a knife edge on a crank in the back yard and think you will have some extra benefit. All I have done is just removed the rough casting and polished it (to help with the removal of the parasite oil that hangs to the rotating crank. Sorry mate, nothing against you, BUT I DO NOT want anyone to ruin a good crank by trying to put a knife edge on a crank.
-
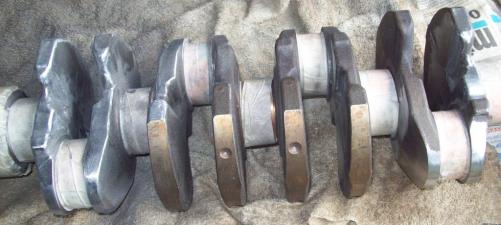
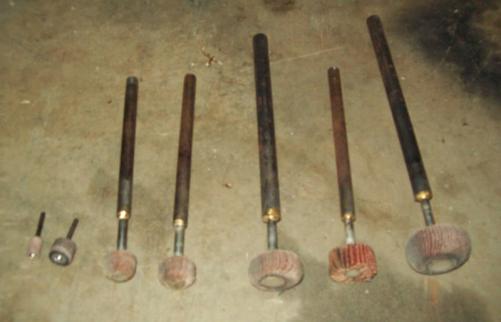
Another update. I am a slack when it comes to posting. I have been polishing my crank for over 6 months :P and I finally finished in September. You know the deal, you start of with the rough stuff and work your way down to the smooth stuff. And again I know this will not amount to anything, but I have just because I can. Anyway hare are some pictures. Things I have used 5 and 7 inch flappy wheels (that went onto a 9 inch grinder) and various sizes of small flappy wheels for a drill and some small die grinder sanding drums. This is the crank I started with Next I raped some tape around the journals and then taped on some old bearings (I did not want to nick the main or conrod bearing surface on the crank). Some early progression (at this stage I was thinking what have I got myself into) As time progressed it was looking a little better. Semi finished Comparing the cranks (polished to rough cast) Polishing is finished This was done over 6 months or so, with an hour here and an hour there, I was in no hurry. You may ask why and my answer is “because I can”. A few weeks back I received some goodies while the Aussie Dollar is going good. Conrods to suit Pistons Flywheel (a little bit lighter) ARP stud kit Now all of the above, block and crank with the goodies have been sent off to Sydney for a little bit of machining. The block, crank and goodies are undergoing; Deck block Line hoan mains Torque plate bore Linish crank Balancing all the rotating mass I hope to have all of this back before Christmas


-
Can not answer your question but i just uploaded some pictures fine just then All the best
-
Just a little update of what I have been up to. Now I know that that this will not achieve anything, but I am doing it because I can and in the mean time I am saving funds for the motor build. First I gave the casting a bit of a clean up with the die grinder. Then I used some different size diameters and grit grade of flappy wheels with an extended shaft length so I could reach deep into the block. This was used to clean up the cast marks even more. Next it was out with the wet and dry to make it all smooth. (will have to find a picture) All up with an hour here and there it would have been about 16 hours.


-
Firstly glad that you are OK and on one got hurt except for your heart :( Your ride was just starting to look so sweet All the best for your future build
-
Thanks for the photo's mate


