

_FNQ_rolla_
-
Posts
401 -
Joined
-
Last visited
-
Days Won
2
Content Type
Profiles
Forums
Events
Gallery
Blogs
Everything posted by _FNQ_rolla_
-
Yeah HP to KW would be around 260KW
-
Hi there, The motor only has done 350kms and I have already done an oil change so it was off to the rollers for a tune (I really did not like driving it with the base tune). We only took the boost to 18psi for the time being (as I would like to put a few more kms on it) and I want to come back next year with a few more modifications.

-

Rolin Auto 4Age Bellhousing To W Series Box
_FNQ_rolla_ replied to bourtoni's topic in General Mechanical
Hi there, The bell housing in that link is a Nites bell housing from New Zealand. I bought mine from Nites and had it sent to my door (think it was only like 3 days to get here). Everything bolts up nicely and the only thing you will have to do is drill and tap the threads for your clutch slave cylinder. You will save $$$$ if you buy it direct from Nites. All the best -
Took the little bomb out for a bit of a drive on the weekend to load up the motor to help with the running in process. I stalled it about 3 times before I even started to move (that clutch is going to take a bit of getting used to). It was not much fun to drive (especially in the city) because the ecu was set to have a rev limiter of 4000 rpm, the VVT was turned off and the boost was set a 7psi. Out on the open roads it was much better as I could load it up to help bed in the rings, I can feel the motor starting to free up. When it goes back for a tune on the dyno the other functions of the ecu will also be set up such as; VVT Boost control Antilag Flat Shift Launch Control Then it should be a little bit more exciting to drive.
-
I would like to see a power output around the mid 200’s before NOS is applied
-
Got a base tune for the ECU today :)

-
Well i'm hoping to have it on the dyno next week to run it in and ready to take on the "Movember Cruise" so you might see it on the streets soon ;)
-
Ok Motor is back in and I’m off to the tuners tomorrow to get a base tune to make sure it is all wired up correctly. Might even get to fire it up if all goes well. Anyway here’s a few pictures with the motor in


-
O yeah, it’s that time of the year again, (thanks) well the plan is to have the motor in on the weekend and if all goes well, off to the tuners the week after.
-
Now it’s time to put the motor back in.


-
The engine bay is all rubbed back ready for a new coat of paint on the weekend.
-
Removed the engine yesterday and today finished welding up any unnecessary holes in the engine bay. This afternoon I started to rub the engine bay back for a new coat of paint to tidy it up. Hope to give it a spray next weekend.


-
There has been a lot of planning going into this With the boost pressure I am planning to run with this engine I will be running the liquid to air barrel with an ice slurry to help lower the intake air temperature.
-
Thanks everyone for the great feedback. Not really sure what you are saying about a top mount turbo and I do think that top mount turbo’s look good but in a small engine bay I went for a low mount for a couple of reasons; With the turbo manifold I had the turbo mounted / positioned a little further away from the block so the runners for the turbo were straighter (bends slow down the exhaust velocity) With a low mount turbo the bend straight after the turbo has less of a bend than a top mount would and then there’s the bend from the dump pipe that goes under the car, this also has less of a bend then a top mount (once again bends slow down exhaust velocity) Again these little things may not amount to anything, but with this build I am trying to get the most out of everything)
-
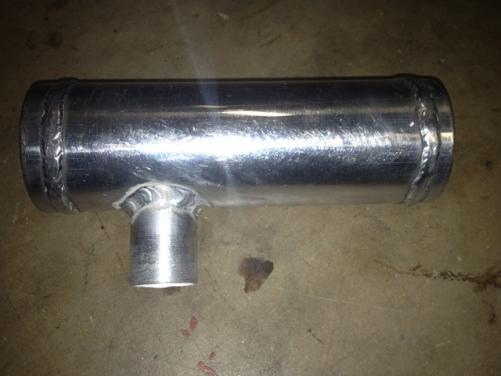
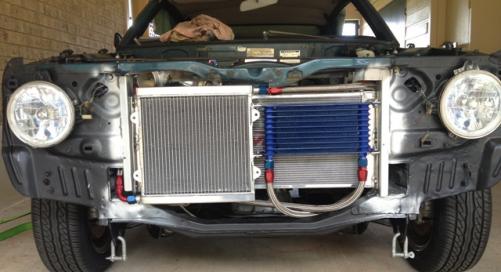
Over the weekend I plumbed up the intercooler and polished up all of the aluminium pipes. The following two pictures show where the blow off valve will be attached. I have the blow off valve exhausting into the turbo intake at an angle that it exhaust’s onto the turbo impeller wheel to help keep the inertia. (It will probably not amount to anything, but with this build I am trying to get the most out of everything) Here are a couple of extra pictures that show the plumbing of the intercooler piping with the liquid to air intercooler being placed in front and in the centre of the motor. (Everything polished, I like shiny things) What it looks like from the front, just low enough for the bonnet to close. Next on my list of things to do is remove everything in the engine bay for a paint job to give it a tidy up.


-
I turned the oil cooler up the other way and I changed the intercooler water radiator so the fins are running horizontal, that way they will be the same as the engine radiator. I did want to run the oil cooler hoses towards the front of the car as in the photo but I will just run them over the top of the radiator and back the remote oil locator on the side of the block.

-
I have used paint stripper and a wire brush in the past and they have come up ok. Afterwards I give them a good wash off with water. All the best
-
Yeah it would be nice to see some pictures of your previous rides (Corolla’s) that you have had in your garage. All the best with your new build
-
Hi there, In your first post / 3 photo on the left is a KE55 tank and the other is a KE30/35 tank … well it’s the same as in my KE35. Everything is factory with regards to the spot welded in big plugs/ bungs things. On My KE35 I have the fuel sender (gauge sender) on the driver’s side and the fuel pick up located on the top. I have modified mine just like the tank you have come across Have a read of this thread starting from thread number 107 (it might make a little more sense from what I have tried to explain). http://www.rollaclub...e/page__st__105
-
When I assemble an engine I operate like surgeon paying particular attention to cleanness. I think I read somewhere in your thread that this engine / turbo set up had been used for 3 seasons of drifting and I can not remember if you mentioned if there was any shaft play to begin with? Hope it doesn’t cost you an arm and a leg to have it fixed. Are you going to get a quote first and look at your options? You might decide to go for a bigger turbo for bigger boost or for a different boost curve. All the best.
-
Thanks for the feed back Si. :y: Dummy fitted the hoses to see what it all looks like and I think I am going to turn the oil cooler up the other way just in case I do create an airlock. (It’s not hard to change everything at this early stage). The other thing I am going to change is the intercooler water radiator so the fins are running horizontal, that way they will be the same as the engine radiator. I’ve got some aluminium pipes and silicone hoses that I might need to plumb the turbo to the inlet manifold via the liquid intercooler barrel. I will start on that next week if I get some time.
-
So you were able to squeeze the Toyota brake reservoir onto the Holden master cylinder with that manifold. BTW looking good :y:
-
^^^ Agrees
-
Yeah, I do not want the attention that front mount (air to air intercoolers) can attract, as this car will still be driven on the road. Anyway I did a little bit more on the bomb on the weekend (not a lot though) I would like to have this finished before Christmas. I think that I should turn the oil cooler up the other way so no air will be trapped in the cooler. This is what it looks like with the bumper and grill back on … all stealth … I want the sleeper look but I think the wheels might give it away.


-
More bits and pieces… Intercooler, few different sizes and angle of silicone hoses, T-hose clamps, blow off valve, catch can, oil cooler,-10 braided hose and fittings For this 7AGTE 20V I’m going for a liquid to air intercooler for a couple of reasons. The first being it will have very short piping between the turbo and the inlet manifold, which will have a fast boost response (less volume to fill before the head). The second being because of the ambient temperature up here in the far north and the boost pressure I’m planning on running (I can use it as an Ice to Air intercooler).


